


LupusWorax
-
Gesamte Inhalte
213 -
Benutzer seit
-
Letzter Besuch
-
Tagessiege
4
Inhaltstyp
Profile
Forum
Kalender
Downloads
Treiberreihenfolgen
Alienware Geräte-Lexikon
Beiträge von LupusWorax
-
-
Mehr als zufrieden!!!! der Sandforce Controller schlägt ordentlich ein
 wenn du noch ne stufe schneller willst leg dir die Vertex 2 zu ( ich hab ja "nur" die Agility Serie)
 -
Ich denke die Aussicht auf Erfolg ist hierbei sehr gering. Eigentlich ist die Schnittstelle ja auch für ein WWAN Modul vorhergesehen, jedoch passt hier auch nicht jedes da Dell hier überwiegend mit Bios Locks rumhantiert. Somit denke ich wird die Platte auch gar nicht erkannt werden.
Wenn du das ganze aus dem einen Grund machst um für das Betriebssystem eine SSD zu verwenden, für Daten jedoch eine Normale HDD empfehle ich dir diese hier KLICK MICH
-
Also die Version A07 gibt es ja bereits seit 17.06 und ich hab mein R2 auch noch nicht so lange, kann also gar nicht beurteilen ob es tatsächlich 45Minuten länger anhält, da ich den "aktuellen" Treiber von vorne weg drauf hatte.
-
Ist diese Funktion fix integriert oder bedarf es spezieller Treiber/ Einstellungen hierfür ?
-
Notebook ausschalten / Akku Entfernen/ Power On/Off Knopf 15 Sek. gedrückt halten/ Akku wieder einsetzten/ Notebook hochfahren.
-
Wenn sich die Akkuladefunktion nicht aktivieren/deaktivieren lässt sollte man den Energiesparmodus des Nvidia
Netzwerkadapters deaktivieren ( Computer kann das Gerät ausschalten, um Energie zu sparen)
Danach sollte diese Funktion wieder erfolgreich nutzbar sein.
Grund des Problems liegt an der Energieverwaltung wofür es noch keine saubere Lösung seitens Dell/AW gibt.
-
ZitatM15x
Stealth-Modus ist so beschaffen, dass die Prozessor- und Grafikbenutzung
verringert wird, wodurch der Energieverbrauch und der Geräuschpegel Ihres
Computers gesenkt wird. Stealth-Modus hilft Ihnen, einen 65 W Auto/Air Adapter
zu benutzen.
Sie können auf den Stealth-Modus zugreifen, indem Sie sanft die am oberen
Ende der Tastatur gelegene Sensorsteuerung berühren. Die Sensortaste leuchtet
mit voller Helligkeit, bis die Funktion deaktiviert wird.
M17x
Mit dem Stealth-Mode können Sie Ihr Notebook in einen Stromsparmodus
versetzen, um die Verwendung eines 65W Auto/Flugzeug-Adapters zu ermöglichen.
Dieser Modus ist für den gelegentlichen Gebrauch gut geeignet, wie beispielsweise
für E-Mails und die Musik/Film/DVD-Wiedergabe. Der Stealth-Modus wechselt von
eigenständiger Grafik auf die integrierte Grafik und beinhaltet darüber hinaus
weitere Energiesparmaßnahmen zum Verlängern der Akkubetriebsdauer und zur
Reduktion der Leistungsaufnahme des Systems. Das Wechseln in und aus dem
Stealth-Modus kann, je nach Systemkonfiguration und Betriebs system, einen
Neustart erforderlich machen.
Sie können auf den Stealth-Modus zugreifen, indem Sie sanft die am oberen Ende
der Tastatur gelegene Sensorsteuerung berühren. Die Sensortaste leuchtet mit
voller Helligkeit, bis die Funktion deaktiviert wird.
M17x R2
Stealth-Modus ist dazu konzipiert, um die Prozessor- und Grafiknutzung zu
reduzieren und dadurch sowie den Energieverbrauch als auch den Geräuschpegel
des Computers zu verringern.
ANMERKUNG: Stealth-Modus hat keine Auswirkung, wenn der Computer
über Akku betrieben wird.
Sie können auf den Stealth-Modus zugreifen, indem Sie sanft die am oberen
Ende der Tastatur gelegene Sensorsteuerung berühren. Die Sensortaste leuchtet
mit voller Helligkeit, bis die Funktion deaktiviert wird.
Quelle: www.dell.de
-
Eine weit verbreitete Problematik unter den AW notebooks betrifft unter anderem den Akkumulator.
Nicht selten kommt es vor das sich dieser nicht mehr aufladen lässt.
Hierbei kann in Windows eine Nachricht aufscheinen welche den User darüber Informiert.
Oder aber der Ladezustand ändert sich nicht, auch wenn das Netzteil am Notebook angeschlossen ist. In diesem Fall geht man wie folgt vor.
Zunächst schaltet man das Notebook wie gewohnt aus und trennt die Verbindung zum Netzteil.
Man entfernt den Akku und betätigt danach den Einschaltknopf des Notebooks für ungefähr 15-30 Sekunden. Danach setzt man den Akkumulator wie gewohnt in das Notebook, schließt das Netzteil an und schaltet den Rechner wieder ein. Das Problem sollte behoben sein und der Akku wie gewohnt laden.
Ebenso kann es wichtig sein, die Akkuaufladung über FN + F2 korrekt auszuführen. Oft hilft es, mehrmals hintereinander F2 drücken (während man FN gedrückt hält) bis die "blaue" Batterie angezeigt wird (3 clicks) und nicht die "bunte" Batterie (2 clicks).
-
Versionsdatum: 19.07.2010
Version: 257.30, A01
Download-Art: Treiber
Dateiformat: Festplatte
Dateigröße: 130 MB
Nvidia Geforce GT335M Win7 64 257.30 WHQL
Enthaltene Updates:
1. Updated Whitelist
2. Display Driver Updates
-
Vertrieb (allgemeine Produktanfragen)
Tel.: 0800 335 5661 (gebührenfrei)
08:30-19:00 Montag-Freitag
10:00-15:00 Samstag
Sonntag geschlossen
---------------------------------------------------------------------------
Kundendienst (kaufmännische Anfragen, Lieferzeitanfragen)
Tel.: 069 9792 7350
Internet / Social Media: http://www.aw-community.com/forum/f40/internationaler-aw-techsupport-social-media-2903.html#post33012
09:00-17:00 Montag-Freitag
---------------------------------------------------------------------------
Support (technische Unterstützung)
Tel.:069 9792 7200
08:00-18:00 Montag-Freitag
Email: cer_aw1@dell.com oder auch CER_Services_Email1@dell.com
---------------------------------------------------------------------------
At-Home Support - Technische Support Anfragen
069 979 27230
08:00-20:00 Montag-Freitag
09:00-17:00 Samstag
(Bemerkung: 'At-Home Service ' steht Ihnen bei einem gültigen Service 'At-Home Support' Vertrag zur Verfügung.)
-
Teil 4 von 4
Disable System RestoreDescription: Don't write backup copies of files when installing new programs or making system changes. Can free up between a few hundred MB to a couple GB.
WARNING: Although unlikely, if a driver installation corrupts your system, there won't be an automatic way to recover.
Instructions: Start Menu -> Right-Click Computer -> Properties -> Advanced System Settings -> System Protection Tab -> Click Configure -> Check Turn off system protection -> Click Delete -> OK
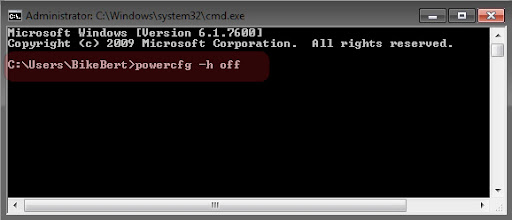
Disable Hibernate
Description: You may free up 1GB of space on the SSD if you have 1GB of memory, 2GB of space if you have 2GB memory. You will lose the hibernation feature which allows the equivalent of quick boots and shutdowns.
Instructions: Start Menu -> Type cmd -> Right-Click the cmd Icon -> Run as Administrator -> Type powercfg -h off -> Hit ENTER -> Type exit -> Hit ENTER
To enable type: powercfg -h on
TRIM Commands
Enable TRIM
Go to the Command Prompt and type:
fsutil behavior set disabledeletenotify 0
Disable TRIM
Go to the Command Prompt and type:
fsutil behavior set disabledeletenotify 1
How do I know if TRIM is working in Windows 7?
Go to the Command Prompt and type:
fsutil behavior query disabledeletenotify
DisableDeleteNotify = 1 (Windows TRIM commands are disabled)
DisableDeleteNotify = 0 (Windows TRIM commands are enabled)
-
Teil 3 von 4
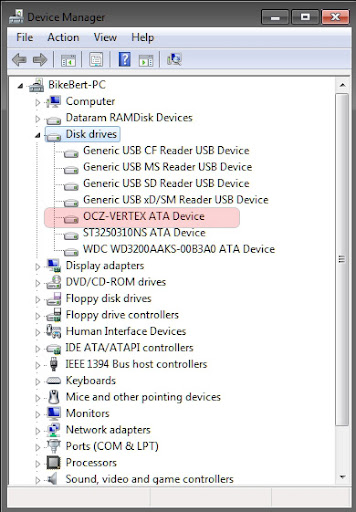
Increase System SpeedEnable Write Caching
Description: This will show you how to enable write caching to have better performance for a storage device.
Instructions: Open the Control Panel -> System and Security -> Device Manager -> expand Disk drives -> Double click on the listed storage device that you want to enable write caching for -> Click on the Polices tab -> By default, "Enable write caching on the device" is checked under the Write-caching policy section. If not, then check it -> Select (check) the "Turn off Windows write-cache buffer flushing on the device" box -> Click on OK -> Click on Yes to restart the computer to apply.
WARNING: Turning off "Windows Write-cache Buffer Flushing on the Device" runs the risk of data loss in case of a power failure without actually shutting down the machine.
Disable indexing
Description: Indexing creates and maintains a database of file attributes. This can lead to multiple small writes when creating/deleting/modifying files. Searching for files will still work.
Instructions: Start Menu -> Right-Click Computer -> Manage -> Services and Applications -> Services - > Right-Click Windows Search -> Startup type: Disabled -> OK
Description: We also need to stop Windows 7 indexing the SSD. SSD drives seek so fast that Indexing is not needed. In fact, while Windows 7 is indexing the SSD it is slowing down your system.
Instructions: Go to Computer -> Right click on SSD Drive -> Properties -> Uncheck Allow files on this drive to have contents indexed in addition to file properties -> Click OK
Once you unchecked indexing follow the onscreen instructions, you may have to skip some files you do not have access to.
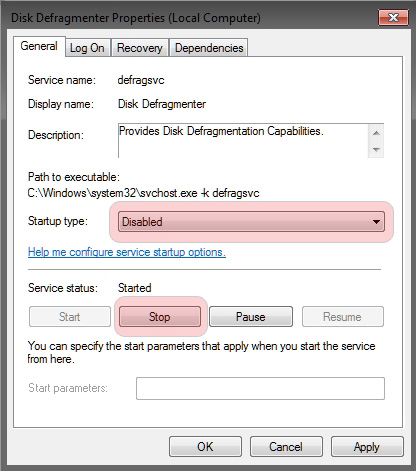
Disable defragmentation
Description: Defragmenting a hard disk's used space is only useful on mechanical disks with multi-millisecond latencies. Free-space defragmentation may be useful to SSDs, but this feature is not available in the default Windows Defragmenter.
Instructions: Start Menu -> Right-Click Computer -> Manage -> Services and Applications -> Services - > Right-Click Disk Defragmenter -> Startup type: Disabled -> OK
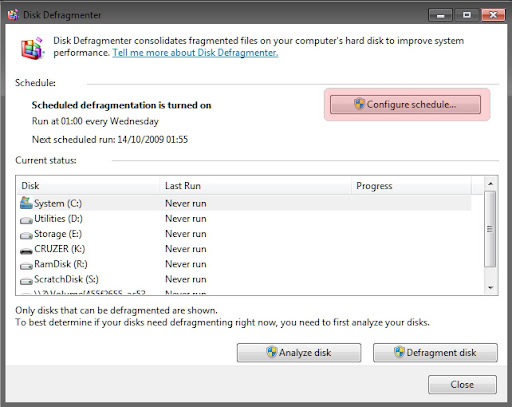
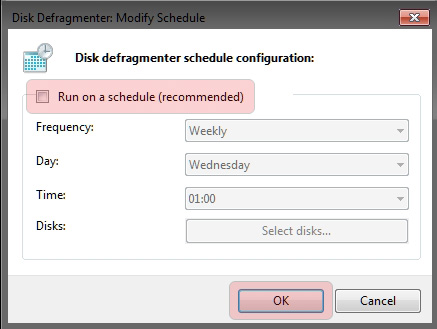
Turn Off the Disk Defragmenter Schedule
Description: Disk Defragmenter schedule allows to run defragmentation automatically in Windows 7. Disk Defragmenter is set to run on a automatic schedule by default in Windows 7.
Instructions: Start Menu -> All Programs -> Accessories -> System Tools -> Disk Defragmenter -> Click on the Configure schedule button -> Uncheck the Run on a Schedule box -> Click on OK -> Close the window.
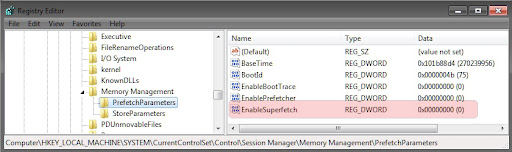
Disable Superfetch
Instructions: Open regedit.exe and browse down to the following key:
HKEY_LOCAL_MACHINE\SYSTEM\CurrentControlSet\Contro l\Session Manager\Memory Management\PrefetchParameters
Find the "EnableSuperfetch" key on the right-hand pane, rightclick it, hit modify and change 3 to 0 and hit OK.
Disable Prefetch
Description: Frees up RAM by not preloading program files.
Instructions: Open regedit.exe and browse down to the following key:
HKEY_LOCAL_MACHINE\SYSTEM\CurrentControlSet\Contro l\Session Manager\Memory Management\PrefetchParameters
Find the "EnablePrefetcher" key on the right-hand pane, right click it, hit modify and change 3 to 0 and hit OK.
Firefox - Use memory cache instead of disk cache
Description: If you use Firefox, there's a way to write cached files to RAM instead of the hard disk. This is not only faster, but will significantly reduce writes to the SSD while using the browser.
Instructions: Open Firefox -> Type about:config into the address bar -> Enter -> double-click browser.cache.disk.enable to set the value to False -> Right-Click anywhere -> New -> Integer -> Preference Name "disk.cache.memory.capacity" -> value memory size in KB. Enter 32768 for 32MB, 65536 for 64MB, 131072 for 128MB, etc. -> restart Firefox
Note: If you're going to install RAM Disk on your computer you can change the Firefox cache location to the RAM Drive.
Please, see the section below called --=[ RAM Disk ]=-- for the instruction.
Free up extra drive space
Disable the Page File
Description: Eliminate writing memory to the SSD, free over 2GB of disk space.
WARNING: If you run out of memory the program you're using will crash.
Instructions: Start Menu -> Right-Click Computer -> Properties -> Advanced System Settings -> Settings (Performance) -> Advanced Tab -> Change -> Uncheck Automatically manage -> No paging file -> Set -> OK -> Restart your computer
Alternatively, if you want to play it safer, you can set a custom size of 200MB min and max.
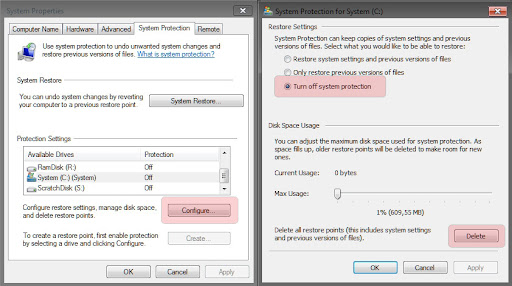
Disable System Restore
Description: Don't write backup copies of files when installing new programs or making system changes. Can free up between a few hundred MB to a couple GB.
WARNING: Although unlikely, if a driver installation corrupts your system, there won't be an automatic way to recover.
Instructions: Start Menu -> Right-Click Computer -> Properties -> Advanced System Settings -> System Protection Tab -> Click Configure -> Check Turn off system protection -> Click Delete -> OK
-
Teil2 von 4
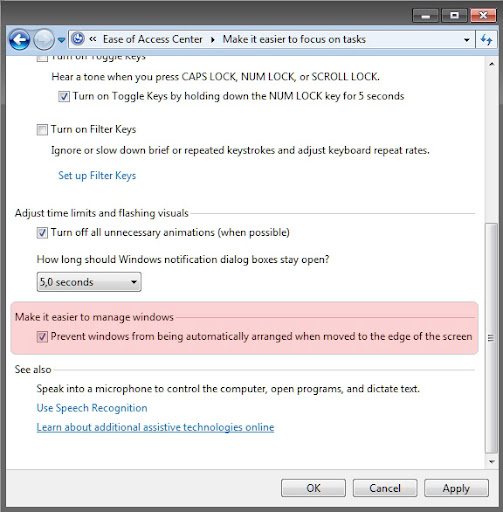
Disable the Aero Snap features in Windows 7Information:
Aero Snap will help you to maximize, minimize and resize the windows just by dragging and dropping it into the screen corners.
Instructions:
Open the Control Panel and double-click on Ease of Access Center icon.
Now click on the Make it easier to focus on tasks seen at the bottom in there
Now tick the check box saying Prevent windows from being automatically arranged when moved to the edge of the screen.
Note: After you disable Aero Snap Feature, you won't be able to use some of the new Windows 7 keyboard shortcuts used to move the active window around the screen, e.g. Win+Left Arrow, Win+Shift+Right Arrrow, etc. See the "Windows 7 Keyboard Shortcut List" section below for more useful shortcuts.
Speed up the Menu Show Delay Time
Information: This will show you how to change the amount of time it takes for a menu in Windows 7 to pop, fade, or slide open when you run the mouse pointer over it.
Instructions:
Press [Win] + R or take the RUN option from the start menu.
Now type regedit there and press Enter Key to open up the Registry Editor Window.
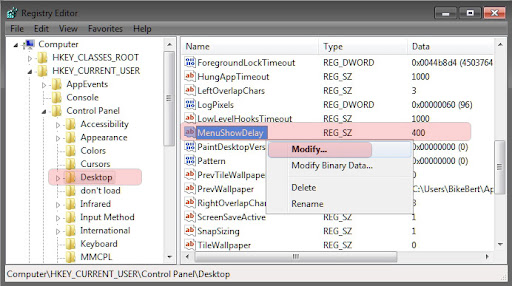
In regedit go to HKEY_CURRENT_USER\Control Panel\Desktop
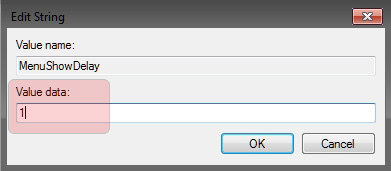
In the right pane, right click on MenuShowDelay and click on Modify
Type in a number between 0 to 4000 [400 is default, I use 1] for how many milliseconds you want the Menu to wait before it opens.
Log off and log on, or restart the computer to apply the changes.
Note: The lower the number, the faster the response time. If you use an entry of 0, there is no menu display delay. However it is not recommended to use 0 though since the menus may be hard to navigate through at that speed.
Change the Mouse Hover Time before Pop-up Displays
Information: This will show you how to change the delay time, in milliseconds, that the mouse pointer has to stay hovered on a item before it is selected or opens a pop-up in Windows 7. For example, how long it takes for a taskbar open window button before to display it's thumbnail preview while hovering the mouse pointer over it.
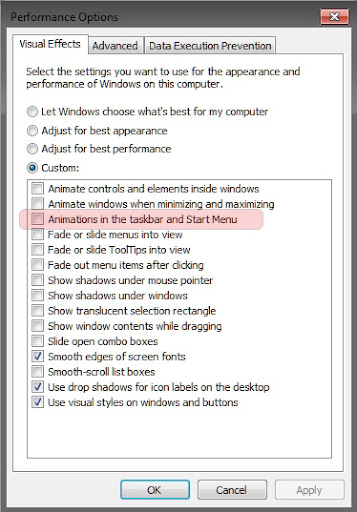
Note: If you have the Animations in the taskbar and Start Menu option checked in Visual Effects, then you may not see much or any difference. You will need to uncheck this option first before doing the tutorial below.
Instructions:
Press [Win] + R or take the RUN option from the start menu.
Now type regedit there and press Enter Key to open up the Registry Editor Window.
In regedit go to HKEY_CURRENT_USER\Control Panel\Mouse
In the right pane, right click on MouseHoverTime and click on Modify
Type in a number between 0 to 4000 [400 is default, I use 30] in milliseconds, that the mouse pointer has to stay hovered on a item before it is selected or opens a pop-up.
Log off and log on, or restart the computer to apply the changes.
Note: The lower the number, the faster the response time. If you use an entry of 0, there is no delay before the taskbar thumbnail preview opens. However it is not recommended to use 0 though since it may be hard to navigate through the thumbnails at that speed.
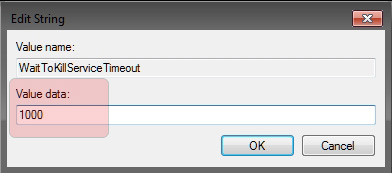
Speed Up the Shut Down Time
Information: This will show you how to set the "Wait to Kill" time Windows 7 waits for programs to save data and close before shutting down.
Instructions:
Press [Win] + R or take the RUN option from the start menu.
Now type regedit there and press Enter Key to open up the Registry Editor Window.
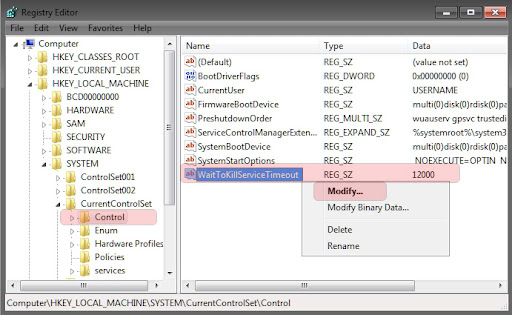
In regedit go to HKEY_LOCAL_MACHINE\SYSTEM\CurrentControlSet\Contro l
In the right pane, right click on WaitToKillServiceTimeout and click on Modify
Type in a number between 1000 to 20000 [1-20 seconds] [12000 is default, I use 1000].
Note: If you have problems with programs from your computer shutting down to quickly, then repeat the above steps and increase the time a bit.
Change from IDE to AHCI Mode after Installation
Information: AHCI stand for Advance Host Controller Interface. AHCI is a hardware mechanism that allows software to communicate with Serial ATA (SATA) devices (such as host bus adapters) that are designed to offer features not offered by Parallel ATA (PATA) controllers, such as:
Hot-Plugging
Native Command Queuing (NCQ) -might improve computer/system/hard disk responsiveness, especially in multi-tasking environment
You can read more about AHCI mode HERE
Instruction: There is one way to fix this, although you need to have knowledge of registry editing.
The detailed steps from Microsoft website are as follows:
Exit all Windows-based programs.
Press [Win] + R or take the RUN option from the start menu.
Now type regedit there and press Enter Key to open up the Registry Editor Window.
If you receive the User Account Control dialog box, click Continue.
Locate and then click the following registry subkey:
HKEY_LOCAL_MACHINE\System\CurrentControlSet\Servic es\msahci
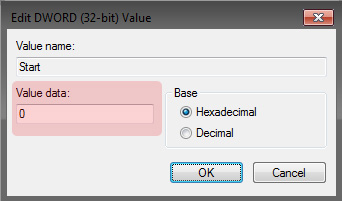
In the right pane, right-click Start in the Name column, and then click Modify.
In the Value data box, type 0 [3 is default], and then click OK.
On the File menu, click Exit to close Registry Editor.
Restart your computer
Go to BIOS and enable AHCI, Save & Reboot
Another restart will be required to finish the driver installation.
Alternatively
Just download this Reg File and double-click to implement AHCI on your Windows-based computer.
Just remember to do the BIOS switch as well when you reboot.
Change from AHCI to IDE Mode after Installation
Instruction:
Exit all Windows-based programs.
Press [Win] + R or take the RUN option from the start menu.
Now type regedit there and press Enter Key to open up the Registry Editor Window.
If you receive the User Account Control dialog box, click Continue.
Locate and then click the following registry subkey:
HKEY_LOCAL_MACHINE\System\CurrentControlSet\Servic es\Pciide
In the right pane, right-click Start in the Name column, and then click Modify.
In the Value data box, type 0 [3 is default], and then click OK.
On the File menu, click Exit to close Registry Editor.
Restart your computer
Go to BIOS and enable IDE, Save & Reboot
Another restart will be required to finish the driver installation.
Alternatively
Just download this Reg File and double-click to implement IDE on your Windows-based computer.
Just remember to do the BIOS switch as well when you reboot.
Enable RAID Mode after Installation
Instruction:
Exit all Windows-based programs.
Press [Win] + R or take the RUN option from the start menu.
Now type regedit there and press Enter Key to open up the Registry Editor Window.
If you receive the User Account Control dialog box, click Continue.
Locate and then click the following registry subkey:
HKEY_LOCAL_MACHINE\System\CurrentControlSet\Servic es\iaStorV
vel
HKEY_LOCAL_MACHINE\System\CurrentControlSet\Servic es\iaStor
In the right pane, right-click Start in the Name column, and then click Modify.
In the Value data box, type 0 [3 is default], and then click OK.
On the File menu, click Exit to close Registry Editor.
Restart your computer
Go to BIOS and enable RAID, Save & Reboot
Another restart will be required to finish the driver installation.
--==[ MORE COMING SOON ]==--
-
Fortsetzung:
Nun ist die Partition auf aktiv gesetzt und muss noch formatiert werden. Standardmäßig wird ein USB-Stick im Format FAT32 formatiert, was auch in unserem Fall richtig ist. Dazu tippen wir den Befehl format fs=fat32 ein und denken wieder an die Enter-Taste. Da wir vor Beginn dieser gesamten Prozedur eine Kanne Kaffee gekocht haben und ein Tablett mit Kuchen auf uns wartet, genießen wir diese Sachen jetzt. Denn dieser Vorgang benötig etwas mehr Zeit. Je nach Qualität und Kapazität des Sticks kann es bis zu 20 Minuten dauern.Nach Beendigung der Formatierung übergeben wir diese mit dem Befehl assign endgültig an den Stick und beenden die Einrichtung unseres nun bootfähigen Installations-USB-Stick mit exit gefolgt von einem Druck auf die Enter-Taste.
Der USB-Stick ist nun bootfähig vorbereitet, es fehlen aber noch die Installations-Dateien unserer Vista-DVD. Diese DVD legen wir nun in unser Laufwerk, dessen Buchstaben wir uns merken müssen. Ebenso ist der Buchstabe unseres Installations-Sticks wichtig, denn sonst können wir die Dateien nicht darauf kopieren. Da der Stick noch angeschlossen ist, starten wir den Windows-Explorer und notieren oder merken uns die besagten Buchstaben. Fällt euch was auf? Genau, nach dem Kopieren der Dateien wird unser Stick mit dem selben Symbol geziert, wie das der Installations-DVD.
Leider können wir die besagten Dateien nicht per Drag and Drop kopieren, sondern müssen auch diese Prozedur über die direkte Eingabe des Befehls in der schon bekannten Konsole machen. Hierbei werden mehrere Parameter gesetzt, welche zur Installation benötigt werden.
Wir beginnen also wieder mit einem Klick auf den Start-Button und dann auf Ausführen, alternativ nutzen wir den Short-Cut Windows-Taste und R. Wir geben wieder CMD ein und klicken auf OK oder drücken die Enter-Taste.
Wir sehen das bekannte, fast leere schwarze Fenster und geben am blinkenden Minus-Zeichen folgenden Befehl ein:
xcopy k:\*.* /s/e/f n:\ (Bitte unbedingt die Leerzeichen beachten!)
Dieses Zeichen: \ erhalten wir, indem die Taste Alt Gr rechts neben der Leerschritt-Taste gedrückt und gehalten wird und zusätzlich die Buchstabentaste ß gedrückt wird.
Nachdem wir die Enter-Taste erneut bemüht haben, beginnt auch schon das Kopieren der Installations-Dateien von der DVD auf den USB-Stick. Da wir noch etwas Kaffee und Kuchen übrig haben, genießen wir das jetzt ein weiteres Mal. Denn auch dieser Vorgang kann 20 Minuten dauern.
Nachdem der Kaffee und der Kuchen nun endgültig verzehrt sind, trauen wir uns wieder an den Rechner und sehen folgendes Bild:
Herzlichen Glückwunsch: Die Erstellung des Vista-Installations-Sticks war erfolgreich!
Nun sind wir natürlich neugierig und wollen den Stick sofort testen. Wir lassen ihn eingesteckt, entfernen die im DVD-Laufwerk befindliche Installations-DVD und starten den Rechner neu. Voller Spannung blicken wir auf den Monitor und es startet.... unser bereits installiertes Vista. Warum? Weil wir im BIOS noch nicht das Booten von USB erlaubt haben. Also ist ein weiterer Neustart fällig, bei dem wir gemäß Handbuch das BIOS aufrufen. Meistens muss dazu während des Bootens die Entf-Taste gedrückt gehalten werden. Bei einigen Mainboards ist es auch die Taste F2 oder eine andere. Welche Taste die richtige ist steht im Handbuch, bzw. am unteren Rand des Monitors kurz nach dem Einschalten des Computers. Beispiel: Press DEL to enter Setup (DEL=Entf). Frei übersetzt bedeutet das: Drücken Sie die ENTF-Taste, um das Menü für die Einstellungen aufzurufen.
Im BIOS angekommen, rufen wir das Menü für die Boot-Optionen auf. Hierzu sollte das Handbuch des Mainboards eingesehen werden.
Quelle: http://www.pc-experience.de
-
Futuremark 3D Mark 2006, i7 640 UM OC 166MHZ Bus, 4GB DDR3 Ram @800MHZ, Nvidia GT335 OC, OCZ Agility 2 SSD.
Futuremark Vantage, i7 640 UM OC 166MHZ Bus, 4GB DDR3 Ram @800MHZ, Nvidia GT335 OC, OCZ Agility 2 SSD.
-
1.) Ladet euch von der Dell Homepage den Passenden Grafiktreiber fürs M11x runter.
2.) Ladet euch den aktuellen Treiber für die GT335 von der Nvidia Homepage runter.
3.) Entpackt das Grafiktreiberpaket von Dell. (Brecht die Installation die im Anschluss kommt einfach ab) Die entpackten Dateien findet ihr unter c:/dell/driver/ Rxxxxx
4.) Entpackt das Grafiktreiberpaket von Nvidia. ( Brecht die Installation die im Anschluss kommt einfach ab) Die entpackten Dateien findet ihr unter c:/Nvidia/Displaydriver/ 197.xx
Jetzt kopiert ihr den gesamten Inhalt des Nvidia Treiberordners in den Ordner " display" im entpackten Dell Treiberordner.
Einfach alle Dateien ersetzen.
Danach könnt ihr den aktuellen Treiber auf euren m11x deinstallieren und nach einem neustart den gerade präparierten Treiber installieren.
Woala schon habt ihr den aktuellsten Treiber und könnt trotzdem noch mit der Funktionstaste zwischen den Grafikkarten wechseln.
-
Teil1 von 2
Was brauchen wir?Einen PC mit installiertem Vista und ein DVD-Laufwerk. In unserem Fall ist es Vista Ultimate 64 Bit.
Einen USB-Stick mit ausreichender Kapazität. Minimum 4GB, besser sind 8GB. Wir haben uns für dieses Modell entschieden.
Eine vollwertige Vista Installations-DVD. Zuvor haben wir uns folgende DVD erstellt: Windows Vista: DVD mit integriertem Service Pack 1. Somit ist unser Stick dann auf dem neuesten Stand.
Das Mainboard muss die Bootfähigkeit vom USB-Stick unterstützen (siehe Handbuch). D.h. das Laufwerk muss im Bootauswahlmenü des Mainboards explizit ansprechbar sein. Sollte dieses Feature im Bios nicht implementiert sein, könnte ein Bios Update helfen.
Zeit und Geduld.
Um Vista auf diese Weise installieren zu können, müssen wir den USB-Stick entsprechend vorbereiten und die Installationsdateien von der DVD auf den Stick kopieren. Hierzu nutzen wir die Eingabeaufforderung, wo wir die nötigen Befehle eingeben.
Den Installations-Stick erstellen
Zunächst schließen wir den Stick an einem freien USB-Port direkt am Mainboard an. Auf keinen Fall sollte ein Hub verwendet werden. Das kann zu Irritationen während der Erstellung aber auch bei einer späteren Installation führen.
Nun starten wir über Start>Ausführen oder die Tastenkombination (Shortcut) Windows-Taste und R den Ausführen-Dialog. Hier tippen wir cmd ein und drücken die Enter-Taste oder klicken auf OK.
Nun sehen wir dieses Fenster:
Jetzt beginnen wir mit der Erstellung unseres Installations-Sticks. In diesem Femster sehen wir ein blinkendes Minus-Zeichen. Hier geben wir DISKPART ein und bestätigen ab jetzt jeden unserer Schritte mit der Enter-Taste. Im nächsten Fenster sehen wir, dass wir ein spezielles Programm gestartet haben, welches ein Partitions-Programm für Datenträger ist.
Um nun zu wissen, welche Nummer unser USB-Stick unter allen angeschlossenen Datenträgern hat, geben wir als nächsten Befehl list disk ein (Enter drücken). In unserem Fall werden uns, beginnend mit der Ziffer 0, folgende Datenträger (Festplatten und USB-Sticks) angezeigt:
0 Festplatte
1 Festplatte
2 USB-Stick
3 Usb-Stick
Diese Auflistung ist nicht eindeutig, weil uns keine weiteren Bezeichnungen der erkannten Datenträger angezeigt werden. Hier können wir uns aber damit behelfen, den gewünschten USB-Stick anhand der Größe auszuwählen. Wir wissen, dass es sich um einen 8GB-Stick handelt. Also ist es die Nummer 2 mit einer erkannten Größe von 7712 MB. Wir merken uns die Nummer 2 also gut, damit wir nicht versehentlich den falschen Datenträger formatieren.
Der nächste Befehl lautet also select disk 2, gefolgt von Enter.
Danach sehen wir die Bestätigung, dass der richtige Stick ausgewählt wurde.
Nun müssen alle eventuell auf dem Stick befindlichen Daten gelöscht werden. Wir haben selbstverständlich vor dieser Prozedur alle wichtigen Daten auf einem anderen Datenträger gesichert. Wir tippen den Befehl clean ein und denken an die Enter-taste.
Es wird uns mitgeteilt, dass der Datenträger bereinigt wurde und wir fahren fort mit dem Befehl create partition primary. Das kommt euch bekannt vor? Genau, so wird auch eine Festplatte partitioniert. Auch das weitere Vorgehen ähnelt der Partitionierung einer Festplatte.
Nachdem die primäre Partition erstellt wurde, müssen wir sie mit dem Befehl select partition 1 auswählen.
Und wie bei einer Festplatte muss diese Partition auf aktiv gesetzt werden, damit davon gebootet werden kann. Das machen wir mit dem Befehl active (Enter).
-
Nettes Overclocking Programm welches bei PM45 Chipsets basierten Notebooks funktioniert.
Viel Spaß beim Rumexperimentieren!!
( Beschädigen könnt ihr nichts da die Spannung nicht angehoben werden kann, natürlich kann es zu Freezes und Bluescreens kommen aber nichts was Hardwarekomponenten beschädigen würde.)
-
Habe im Netz ein spitzen Kompendium zum Verbessern und Tweaken von Windows 7 gefunden wo alles an Tipps und Tricks schön sachlich erklärt wird.
Auf jeden Fall einen Blick wert!!
Quelle:http://www.ocztechnologyforum.com
Teil 1von 4
Zitat--=[ General Windows 7 Performance Tweaks ]=--Change the Power Plan To Maximum Performance
The Power settings in Windows 7 is not automatically set for maximum performance. By default the power plan in Windows 7 is set for a balanced performance with energy consumption on hardware. So you may not get the optimal performance from windows 7 if this is the case. So we need to change the power plan to High Performance Mode.
Double click the Power Options in the Control panel.
Click the down arrow showing Show Additional Plans to see the High Performance power plan
Now just activate the High Performance plan and that's it.
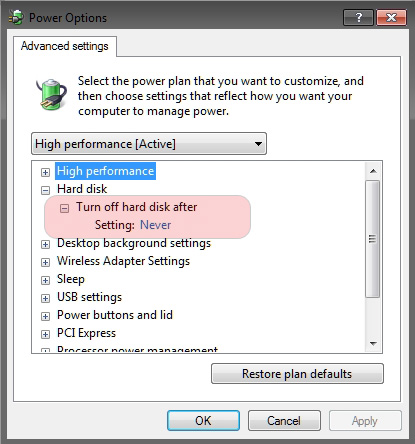
Go for the advanced power settings.
Go to Hard disk, then to Turn off hard disk after and set it to Never. This enables the GC to do its job while logged off.
Speed Up the Windows 7 Bootup Time
Press [Win] + R or take the RUN option from the start menu.
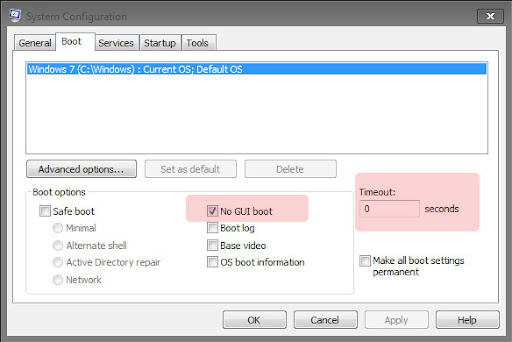
Now type msconfig in there and press Enter Key to open up the System Configuration Window. Click on the Boot tab in there.
You will see a box called Time out. This is the time (in sec) which the system waits for the user to select the operating system to boot to.
You can safely set the value to 0.
Tick the "No GUI Boot" option too [turns off the Windows 7 logo at boot-up].
Click Apply and then on OK.
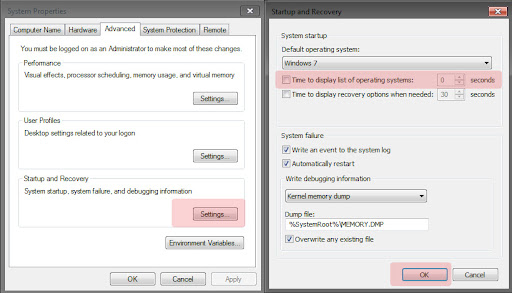
Alternatively to change "Time out" only:
Right click on Computer and select Properties from the right click menu.
Click on Advanced System Settings from the left pane to open up the System Properties window.
Select the Advanced tab from it. Then under Startup and Recovery click Settings.
Now uncheck box "Time to display list of operating systems" and click OK.
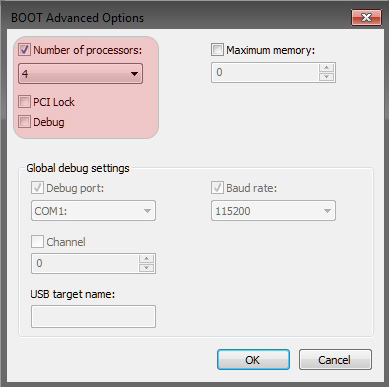
Change the Number of Processors Used at Boot Up
Information:
If you have a multiple core CPU (e.g. Intel Core Duo or Quad CPU) or multiple CPUs, then this will show you how to change the Number of Processors that will be used during boot up for troubleshooting and debugging purposes to be able to determine if there is a problem with a single processor/core, or for a programmer to test their code against a single core while running on their multi-core system.
Note:
Windows 7 will use all your processors by default at boot up without this Number of Processors setting box checked. Using all of your available processors (cores or CPUs) during boot allows the computer to boot faster only because a multiple core CPU or multiple CPUs can handle and do more at once than a single core or CPU. Multiple cores do not actually increase the speed, but only increase the number of processor cores working on the job which in turn has the job finish quicker. If you do not have much running at startup, then you may not notice much improvement in how long it takes to startup.
Instructions:
Click the Advanced Options button. The Boot Advanced Options Window will then pop up.
Tick the check box saying Number of Processors. Now click on the drop down box and select the maximum number of processor cores (might be 2 or more).
[* According to some sources this setting doesn't speed up boot time]
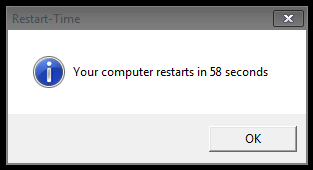
How to See What Your Windows 7 Restart Time is
Information:
This app will show you how long in seconds it takes your Windows 7 to restart back to the desktop.
See the instruction and download the app HERE
Disable the Aero Theme on Windows 7
Right Click on your Desktop and select Personalize click the Window Color Tab.
Uncheck the Box saying Enable Transparency and then click on Open classic appearance properties for more color options.
Then a window will open up. Apply a Standard theme from it.
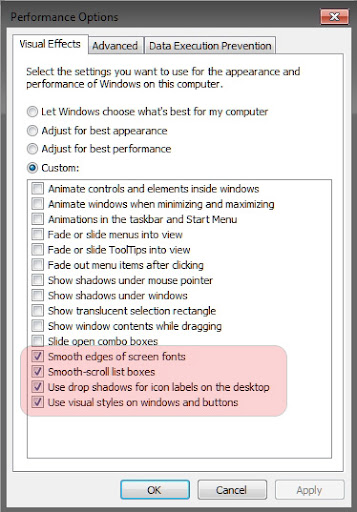
Disable the Unwanted Visual Effects
For this right click on Computer and select Properties from the right click menu.
Click on Advanced System Settings from the left pane to open up the System Properties window.
Select the Advanced tab from it. Then Under Performance click Settings . Choose Custom: Options From it.
Now untick all the options and select only the last four options
Now just logoff your system and turn logon.
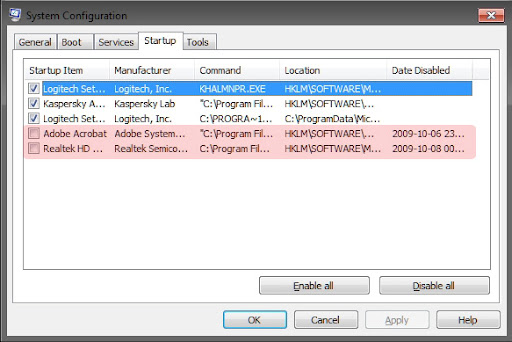
Disable Unwanted Startup Programs
Many programs have components that start when Windows starts and run in the background. While some of these programs are necessary (such as antispyware programs), you will find that others may not be necessary.
Press [Win] + R or take the RUN option from the start menu.
Now type msconfig in there and press Enter Key to open up the System Configuration Window.
In the System Configuration window, the Startup tab shows all the programs that are scheduled to start with Windows. Resize the columns so that you have a good view of the name and manufacturer.
Go through each item, clearing the check box for programs you don’t want to start with Windows.
Click OK, and then restart the computer.
Disable the Unwanted Services
It is more safe to set the following services to manual rather than disabling them. This is because when some times if windows needs a service windows can start it by itself if and only if it is set to manual. If you set it to disabled Windows 7 cannot start the service by it's own.
To open up the Services Window:
Click Start
Select Control Panel
Double click Administrative Tools
Double click Services
or
Press [Win] + R or take the RUN option from the start menu.
Now type services.msc in there and press Enter Key
To disable the Unwanted Service:
Scroll down and highlight the service you want to adjust
Right-click on it and choose Properties
Click the stop button.
Select Disable or Manual in the Startup Type scroll bar.
Services to Disable:
Application Experience
Computer Browser (If your PC does not connect to any network)
Desktop Window Manager Session Manager (If you don't want the aero effects)
Diagnostic Policy Service
Disk Defragmenter
Distributed Link Tracking Client
IP Helper
Offline Files
Portable Device Enumerator Service
Print Spooler (If you do not use Printer)
Protected Storage
Remote Registry (You can safely disable it for more Security)
Secondary Logon
Security Center
Server (If your computer do not connect with any network)
Tablet PC Input Service
TCP/IP NetBIOS Helper
Windows Defender
Windows Error Reporting Service
Windows Media Center Service Launcher
Windows Search (If you rarely use Windows Search feature )
Windows Time (If you do not want to synchronize system time with internet time automatically)
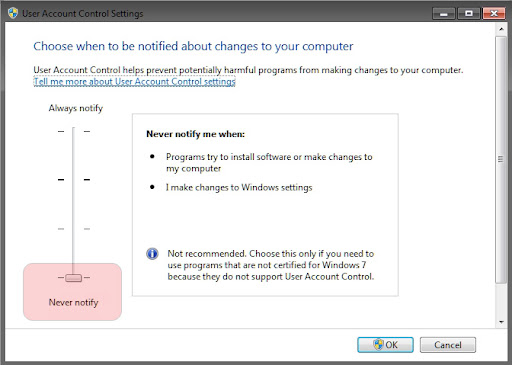
Disable the User account control (UAC) Feature
From the Control Panel open the User Accounts and Family Safety
Click User Account.
Click the User Account Control settings link.
Now just Drag the Slider towards Never Notify.
Click OK and Reboot your system.
Disable UAC With a Registry Hack
Press [Win] + R or take the RUN option from the start menu.
Now type regedit there and press Enter Key to open up the Registry Editor Window.
In regedit go to HKEY_LOCAL_MACHINE\SOFTWARE\Microsoft\Windows\Curr entVersion\Policies\System
In the right pane, right click on EnableLUA and click on Modify
Change value to 0.
* UAC Enabled: 1
* UAC Disabled: 0
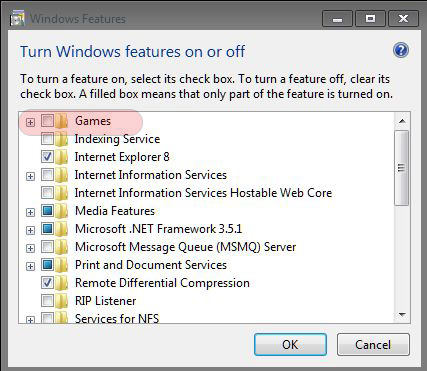
Turn off Unused Windows 7 Features
There are many feature in windows 7 that we often don't use.
Disabling these unused features in Windows 7 will really help in speeding things up.
Open up Programs and Features from Control Panel.
Click the Turn Windows features on or off from the left pane.
Now uncheck all the Feature that you don't use in Windows 7 [e.g. "Games"] and restart the system for the changes to take effect.
-
 1
1
-
-
Nachdem ich mir über Ebay für etwas mehr als 70€ einen WWAN karte geschossen habe und diese im M11x verbaut habe trat anfangs das Problem auf das in Europa keine zusätzliche Antenne für dieses Modul verbaut/ vorgesehen war. Man konnte sich hier abhelfen indem man eine Antenne der Wlan Karte an dem WWan Adapter koppelte. Der Nachteil dieser Lösung ist jedoch das die mögliche Bandbreite stark eingeschränkt wird. Ich habe mir deshalb auf Ebay eine Zusätzliche Antenne für lau geschossen ( 2,95$ kostenloser Versand) Nachdem ich die Antenne erhalten habe machte ich mich gleich an den Einbau.
Mein Vorhaben gestaltete sich schwierig, denn es gab nicht viele Möglichkeiten die Antennen zu verbauen. Da es sich um ein Sub/Netbook handelt und alles auf engsten Raum verbaut war schien mein Vorhaben ein gutes Ergebnis zu erzielen schwierig. Die Antennenkabel sind mit fast 1Meter länge fast nicht unterzubringen und der einzige Platz für die Antennen Selbst schien sich in der Harddiskbay zu befinden. Es war mir möglich nach demontage der Rückenplatte besagte Antennen unterhalb der Festplatte zu platzieren, jedoch besteht das Gehäuse aus Gusseisen und schirmt die Antenne stark ab. Nachdem ich die Antennenkabel irgendwie verlegen konnte und die Festplatte ebenfalls wieder verbaut hatte waren die Empfangsergebnisse äußerst schlecht bis gar nicht vorhanden.
Es half nichts und es wurde mir klar das ich hierbei einen größeren Eingriff machen musste. Dank der ausführlichen Demontageanleitung welche man auf der Dell Support Seite finden kann bereitete ich alles vor meinen kleinen auf seine Einzelteile zu zerlegen.
Ich Suchte nach einer Stelle welche nicht von Metall ummantelt war, Die Handballenauflage bestand nur aus Kunststoff somit war die Frage nach der Montagestelle geklärt ( Rot eingekreiste Stelle auf dem dritten Bild). Nachdem ich die Antennen angebracht hatte ging es noch darum die Antennenkabel sauber zu verlegen. Glückerlicherweise befinden sich an den Außenrändern Hohlräume in denen man überflüssige Kabellängen verstauen kann.
Der Umbau war zufriedenstellend und die Emfpangsleistung konnte erhöht werden. Es handelt sich jetzt aber auch nicht um eine extreme Verbesserung.
Hinzukommt das mein Wohnort eine sehr schlechte UMTS/ HSDPA/HSUPA Netzabdeckung hat.
Zumindest muss ich mir keine sorgen machen die Karte mit N-Draft abzuschießen
-
Im Internet gibt es dutzende verschiedene coolingpads auf denen man sein Notebook parken kann um es mit genügend Frischluft zu heißen Zeiten zu versorgen. Schön und gut, aber auch ganz schön teuer. Immerhin handelt es sich hier nur um ein Gestell mit ein, zwei Lüftern und mehr ist da auch schon nicht. Ne ne, die bekommen keinen Cent von mir, sowas mach ich mir schon selbst
Herstellungsdauer: 40 Minuten
Was man dazu Benötigt?! Ganz einfach, und zwar:
Eine solide flache Karton Steige ( diese findet man zur genüge in Supermärkten und kann diese auch gleich praktisch-erweise als Lebensmitteltransport- Schachtel verwenden bis man zuhause angekommen ist)
Klebeband ( Transparent oder Isolierband)
Doppelseitiges Klebeband ( das etwas dickere mit der Schaumstoffschicht dazwischen)
Ein x beliebiges 12 Volt Netzteil ( Steckdosen Netzteil, ATX Netzteil egal, hauptsache 12 Volt Gleichspannung und zumindest 0,75Ampere)
Ein paar Lüfter ( je nach Laune und Nutzen, je größer umso leiser, je kleiner umso lauter ich empfehle euch 2x 120er Lüfter , 80iger gehen wohl auch grad noch)
Aufklebbare Gummipfropfen ( Abstandhalter dienen dazu damit das Notebook nicht komplett auf der Schachtel aufliegt, somit kann die Luft das ganze Notebook Gehäuse gleichmäßig umströmen)
Messer
Schere
Zu guter letzt sollte man zuvor auf jeden Fall mindestens zwei Episoden Mac Gyver anschaun, dies dient zur Bastler ischen Motivation
Eine genaue Anleitung gibt es hierbei nicht denn jeder soll sich sein "Coolinpad" so gestalten wie er es selbst für am besten hält.
Um euch aber eine Idee zu geben hier ein paar Bilder von meiner Kreation.
-
1
-
-
Hier nun das versprochene Video.
Es ist nicht sehr liebevoll gemacht aber nachdem mir beim ersten Versuch des Video Schneidens mein Rechner abgekackt ist und die ganze Mühe umsonnst war hier nun das beinahe Rohmaterial.
-
1
-
-
Besonders für Besitzer des M11x von Nutzen wo jedes Stück Ressource zählt deaktiviert folgendes Programm alles an unnötigen Diensten, Programmen etc. Einfach per Knopfdruck in den Gamingmodus wechseln und nach dem Spielen wieder zurück zum Normalmodus.
Habs ausprobiert und bin positiv überrascht!!!!
 wenn du noch ne stufe schneller willst leg dir die Vertex 2 zu ( ich hab ja "nur" die Agility Serie)


Interesse an einem Alienware Counterstrike-Clan mit eigenem Server?
in Community Games
Geschrieben
Beschränken wir uns lieber auf die Frage ob Interesse besteht als das wir technische Details und Spezifikationen preisgeben.